|
|
 |
 |
|
|||
|
HOME
|
|


Antique
Automobile Cleanup and Restoration with USA Fluid.
Case Study of a 1927 Model T Ford
'Doctor's Coupe'
Using Next Generation Conditioning Fluid
on prior generation collectables.
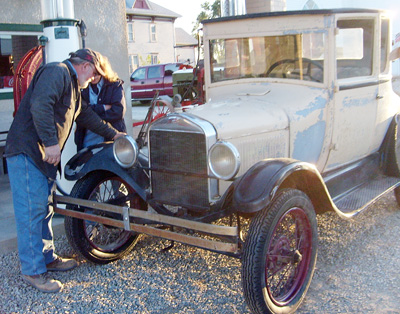 The T Arrives in the evening: Owner Ron Holland shows the newest Model T in his collection to people in the late day sun. This vehicle is on display for the weekend show and is parked in front of a period gas station. It has recently come into his possession from nearly four decades of storage in a small wooden garage. Ron's not afraid to let the USA Fluid Guys go to work on his T. He uses StrongArm on heavy equipment, cranes, rigging and trucking vehicles with his house moving and excavating business, as well as on his collection of Antique Cars, Tractors, Steam Engines and Saw Mills. It's shown here at Heritage Park of North Iowa, a 90 Acre Preserve, located in Forest City, IA just south of the Winnebago plant, where he helps out with the reclamation and re-construction of antique buildings and barns. The fully restored and functional church shown behind the T model is one of the many restored buildings on a road within the park. More information about the park is at the bottom of this page. |
 The T Model after sitting overnight, waiting for things to get underway. We will go over it on the bumpers, the chrome, and then go into the engine with treatment. For the sake of understanding, pictures are marked Before and After. |
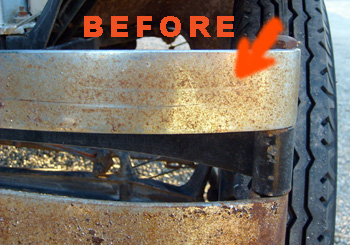 Get Started: We begin here with the rusted chrome bumper. |
 Rust Removal: Here's the bumper after applying USA Fluid, light wire brushing for several seconds and wiping with a clean rag. |
 Light Brushing: Bystanders are flabbergasted to see wire brushes going to work on chrome, and shake their heads when the clean restored chrome is returned. |
 This is the first area of the bumper that is shown being brushed on the left, and what it looks like when it's buffed with a clean cloth. This chrome will remain pristine in storage for many upcoming years. |
 Halfway: Here's the bumper with one side done. |
 Here's the bumper with the other side now done. |
 |
 |
|
|
 ALL DONE: This is the bumper after all the sections have been USA Fluid Treated, brushed and wiped. |
 |
 ..Here we have the chrome around the radiator, shown both sides before.. |
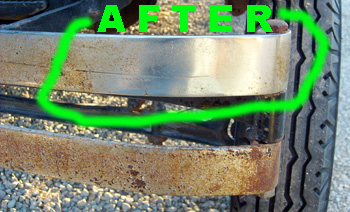
 Comparison: Here we have detail on the before and after. The left side circled in red is the before, and the right side circled in green is the after area. A close up of the after is on the right.... |
 Mirror Finish Returns: Detail of the left side AFTER, showing the non destructive removal of the rust which was performed within several seconds with Unlimited StrongArm spraying, wire brushing and wiping. |
 |
Shown here is the engine on the drivers side with
the ignition buzz coil box and the corrosion and rust that
is in the entire compartment.
|
 |
Close up view of the radiator, fan and belt
|
 |
Focusing here on the top of the engine block with
the Klaxon horn, spark plugs and wiring all upon oxidizing
Lead based paint.
|
 Here is the intake side of the engine in several views, getting closer up for intricate detail. |
 Here in the first after picture, you can see how the black paint along the bottom and the firewall has been de oxidized. Just applying USA Fluid is all that was done to the painted surfaces. |
 |
 The small rag shown here was all that was used for wiping all the corroded areas which were spray in the entire engine compartment. |
 Close up detail of the corrosion and oxidation and rust. |
 Wiping off the top of the head removed the grime and Lead powder that was sitting on the paint. |
 |
 Here we see the treated manifolds and components. |
 Here is a close up of the corroded Brass inside the yellow circle. Note the rubber on the radiator hose, how it's blackened up from the USA Fluid that was applied from the other side of the engine. It's penetrating into the rubber and revitalizing it and all the material around it. |
 Note in particular, the brass valve and hardware and how nicely it comes back to a finish, with a full antique patina. |
|
Shown on the right is the completed engine
compartment which was done in the little bit of time we had
to spend on it. Total time was about 20 minutes going all
around and visiting with spectators as time went by working
with it.
|
 |
|
Here we have the completed engine and compartment
from being treated, the fender and running board and body
section behind the engine. Nothing was done with the cream
yellow color, which will be repainted with the proper
original matching paint as more work is done on this vehicle
sometime in the future. Compare the nice shiny paint on the
headlight and fenders now with the dull white dust of Lead
powder that was on the surface of them when we started,
which comes out of the metal pigment in the paint as it
corrodes over time. Unlimited StrongArm Brand will prevent
that toxic Lead from coming out of the original paint,
keeping it fresh for another generation.
The old 6 ounce can of USA Fluid is all that was
used to do all the things that you see here. When we
finished and went on, there was still an ounce left in the
can. This can is no longer produced - the bottle that you
get now has a full quart of liquid which is 5 times as
much. |
 |
 The dingy condition of the headlights on the vehicle as it arrived, with the film of corrosion on the surfaces of the chrome and paint. |
 Here's the application of several drops of USA Fluid onto a headlight and the hardware |
 |
 Here's the wiping of the chrome and painted body of the light. |
 |
 |
 Shown here is also the before of the door panel as well as the dashboard and components. The metal plate below the pedals is covered with dirt over the rust that's all over it. |
 This shows the Door after, with full detail below where the doors are shown. Also is the kick plate under the pedals, which is cleaning up nicely on the corner area where the cleaning has begun. The Lead oxide from the paint that was smeared around from wiping is also removed. |
 Close up detail of the soiled floor boards and pedals, before anything was done to them. |
 A close-up of he dashboard showing the gauge and switch which was wiped with a clean cloth, along with the metal. |
 Passenger door before any treatment. At one time, someone sprayed a gray primer over the original painted surface of this panel, right on top of the paint and rust, and now the rust is continuing to eat away the metal under that paint as can be seen. |
 Close up detail of the lower part of the passenger door after treatment. The rust at the base of the door seam is stopped, and the original paint is restored. This process will continue over the rest of the door with additional applications. |
 Here is an AFTER close-up detail of the door shown above with the interior treatment. Note how all the rust is arrested, and how the Lead based paint is completely rejuvenated. Painting USA Fluid onto the inside and outside of car doors will revitalize the Original Lead Based Paint and metal and eliminate any worry of rusting. No repainting will be necessary. All original finishes can be maintained, increasing the value and point score if and when the vehicle is ever judged in an AACA regional car show. |
|
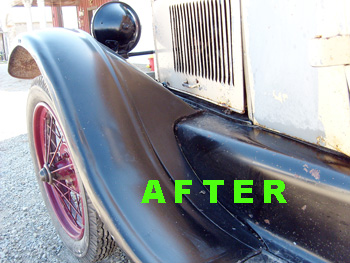
View looking forward of the light and fender and
body after treatment with Unlimited StrongArm Brand. Compare
these areas with the before pictures above.
Note how nicely the paint on the spoked wheel has been rejuvenated. |
 |
|
View of the passenger side and engine with the
overall cleaning on the headlight and fenders
|
|
 This is the cap on the radiator as it was when the Model T showed up. |
 Here we have the same cap after applying USA Fluid and letting it remain on the metal for a little while, and then wiping and buffing it with the work rag we were using. The bottom part of the cap that screws into the radiator is copper, and the top section which at one time housed a thermometer is all brass. It has rounded beveled glass on the sight gauge in it's center. The innards appear to have been shaken about and tumbled into pieces and rotated out of the original position. There no doubt that this can be opened up and restored by the collectors who have retrofitted them with modern components. |
 |
 The highlight of the days presentations is the 15 bottom plow pulled by the 110 HP Case Steam Traction engine shown here. |
 View entering main section of park with stores and facilities. |
 Here well trained youngsters operate a fully functional scale model steam engine |
|
Photographs by L. Kroneman
|


![]()